Oilcloth swim bag tutorial
What-ho, Joy of Sewers!
My good friend asked me to make a swimbag for her from a piece of oilcloth she'd bought. She had a bag that she liked which was the perfect size for three sets of swimmers and towels but which was wearing out, so I measured it up and then thought you might like to follow the process!
First I cut one long piece of oilcloth for the body of the bag (so that it would only need to be folded in half and sewn up the short sides) and two long thin pieces for the straps. You can make these pieces any size you like, but for this bag I cut one piece of 64cm by 96cm and two of 5cm by 80cm respectively. I also later cut an extra rectangle which measured about 15cm by 40cm, which would become an internal pocket.
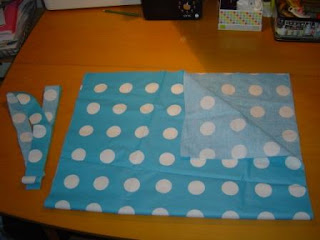 |
| Cut fabric pieces - less the internal pocket which I only decided to make later... |
Step 1: fold the strap pieces in half along their length and stitch with two rows of triple-stitch for strength
 |
| Sewn straps |
Step 2: Fold the large rectangle piece in half across its width, so that the wrong sides are together. This leaves the right side visible on the outside. Sew up both the lefthand and righthand short edges, with a 0.75cm seam allowance, starting from the corner nearest the fold and ending at the corner nearest the opening. You will be left with a rectangle with sewn-closed short sides, a folded base and an open top. I found that the oilcloth travelled a bit during this process (which is why it's neater to start sewing from the folded end) and it no longer exactly matched up at the open end, but this will all be tidied up later on. Don't panic!
 |
| The first seam in the two-step French seam process. Seems odd to be sewing wrong sides together, but it works! |
Step 3: Trim off both the lower corners, where the line of stitching meets the folded long edge. Then turn your bag inside out and poke out the corners by using a chopstick or similar, so that they are square. The trimmed corner will reduce the bulk of material here and give a crisp finish. Don't be tempted to use your scissors to poke out the corners, or you'll end up with a hole...

Step 4: With right sides together and the wrong sides outermost, stitch up lefthand and righthand short edges again, starting from the folded base once more and with a 1.5cm allowance this time. You are now left with a neat French seam which hides all raw edges. Lovely jubbly.
 |
| A finished French seam, ooh la la! |
Step 5: Make the internal hanging pocket, by folding the last remaining rectangle as shown below. I hemmed the raw edge just above the 'Joy of Sew' label (but with oilcloth this isn't really necessary). Close the outer two edges with a 0.5cm seam, sewing wrong sides together. You can make your pocket any size you like, but I intended this one to be just the right size for a phone and perhaps some keys. You could add a keyclip on a ribbon or elastic at this stage, or separate the pocket into two sections with a seam or add a zip. Whatever tickles your pickle.

Step 6: Turn your bag the right way round again. Fold down the top edge all round so that a generous 4cm fold lies inside the bag. Then tuck half of it under itself all round to form a neat rolled edge which is 2cm wide. Lay your internal pocket so that it also inserts under that seam, exactly halfway along the inside of one side of your bag. Do take the time to measure and pin this in place, as it would look odd if not centred...
Step 7: Next insert your straps, again tucking them up under your rolled edge. I found mine worked well being placed the same width as my internal pocket, but this is up to you. The key thing is to measure up so the straps are the same distance from the two outer side-seams of the bag. Pin in place and do the same for the straps on the other side of the bag, checking that both sets of straps are located exactly opposite each other AND that they are lying flat and don't have a twist in them. Take a moment to hold the bag up and check the strap placement, after you have pinned and before you have stitched them in place. More checking, less unpicking is my motto!

Step 8: Sew all the way round the rolled and pinned edge of your bag, not once but twice.
The first time, do this near to the inner edge of the folded seam, with the straps hanging down into the inside of the bag (so that they lie pretty much as shown in the photo above).
The second time, fold the straps up and out of the bag, over the seam you've just sewn, so that they lie in the carrying position. Then stitch a line on top of them, nearest to the open edge of the bag all the way round, to add strength and to ensure the straps prefer to hang out of the bag rather than inside.
 |
| Just going over a strap with the second seam. |
 |
| And here's the internal pocket and the straps, now all sewn in place |
Step 9: Now to give the bag some shape, I needed to create a base and sides that were 10cm deep. Yay, gussets!! To do this, turn the bag inside out again and then hold it upside down with a side seam facing towards you and the base uppermost. Putting your thumbs and forefingers up near the corner, pinch the side and the base together and flatten out one corner.
Shift the fabric between your fingers and thumbs until the side seam lines up with the base centre fold of your bag. You should have a shape like the photo below. Don't worry about the French seam itself - it will protrude beyond the nice neat triangle you have created and this is fine, as long as it lies flat and points the same way all down the side.
Lay this corner carefully flat on the table and, holding it taut and using a tape measure, draw a 10cm-long straight pencil line in such a position that it runs exactly from edge to edge, as per below.

Step 10: Stitch along that line, right sides together, using a triple stitch. Repeat steps 9 and 10 for the other corner and you will be left with a bag that has corners which look like this:
 |
| A sewn corner gusset when inside out. |
 |
| A sewn corner gusset, right way round, looking down inside the bag |
And here's the finished article (excuse the poor photos, it was late and there was no one awake to hold the bag for me!):


Oilcloth is great for this project - especially this thinner kind which I have only so far found in Ikea and which is cheap as chips and lovely to sew - but you could undertake this in canvas, linen or cotton if you wished. You'd need to have an iron at the ready to press in the seams, but the principles are otherwise exactly the same.
I'd love to hear about your results if you follow this tutorial - or with alternatives or suggestions for customisation. Do get in touch, peeps.
Happy sewing!
S x


Cheap 'n' thin oilcloth can be found in both The Range (cheapest and thinnest) and Dunelm Mill stores. (Disclaimer: Other low-rent fabric purveyors are available.)
ReplyDeletePippa x
Thanks Pippa, will check it out! S x
ReplyDelete