Reverse applique - yay!
Hi there lovelies!
Just wanted to share my latest project with you, because I'm so pleased with how it turned out. I had been actually dreaming of this since making the Figgy's Tea for Two jersey dress a while back. It had some great suggestions for embellishment and REVERSE APPLIQUE was one of them. Lookit, lookit!
I am pleased with this first effort. I mean, there's room for improvement (some of the stitched lines are too close together to snip away the jersey between them, for example, and some snipping is a bit ragged - I need sharper small scissors) but it was so much fun to do and the possibilities are endless. What a great way to change two stained t-shirts into one gorgeous one or to personalise clothes with slogans, names, initials or favourite images! Boden, eat your heart out.
Or, rather than starting with an image, you could use a strong geometric print as your feature (underlying) fabric and cut windows in the top fabric to highlight the print itself - think how amazing a plain t-shirt neckline would look with almost a stained-glass effect stitched around it!
Other links you might like: Sweet Verbena blog tutorial, Alabama Chanin, creating your own applique stencil with greaseproof paper and a Sew Mama Sew review of an Improv Sewing project
What do you think of that? I'm clearly delighted!
Any projects you're proud of this week?
S x
Just wanted to share my latest project with you, because I'm so pleased with how it turned out. I had been actually dreaming of this since making the Figgy's Tea for Two jersey dress a while back. It had some great suggestions for embellishment and REVERSE APPLIQUE was one of them. Lookit, lookit!
 |
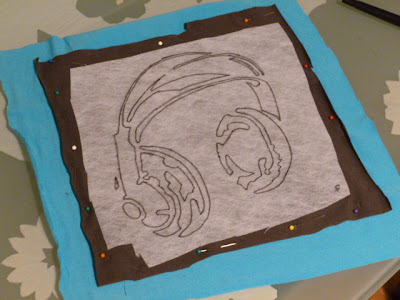
| Lovely stencil from a book by Ed Roth, drawn in reverse onto the non-fusible side of fusible interfacing |
 |
| Fusible interfacing ironed onto the wrong side of the (grey jersey) feature fabric, which is then pinned to the wrong side of the main (turquoise jersey) fabric |
 |
| Still on reverse: all drawn lines overstitched in black thread, excess interfacing and grey jersey trimmed away neatly |
 |
| Front view showing stitching |
 |
| Turquoise jersey carefully snipped away to reveal grey underneath |
 |
| Finished article! |
Or, rather than starting with an image, you could use a strong geometric print as your feature (underlying) fabric and cut windows in the top fabric to highlight the print itself - think how amazing a plain t-shirt neckline would look with almost a stained-glass effect stitched around it!
Other links you might like: Sweet Verbena blog tutorial, Alabama Chanin, creating your own applique stencil with greaseproof paper and a Sew Mama Sew review of an Improv Sewing project
What do you think of that? I'm clearly delighted!
Any projects you're proud of this week?
S x


Comments
Post a Comment
Hi, please leave your comment here - and click on subscribe by email below if you want to be notified of replies to your comment or new comments on this post: